
Uniswap is the world’s largest decentralized exchange — processing hundreds of billions in annual trading volume. Every trade on Uniswap executes against liquidity pools funded by ordinary users called liquidity providers (LPs).
As an LP, you earn a percentage of every trade in your pool. On high-volume pools, this can generate meaningful passive income. The tradeoff: impermanent loss — the risk that your position is worth less than if you’d simply held the tokens.
This guide walks through everything: choosing the right pool and fee tier, adding liquidity step by step on Uniswap V3, managing your position, collecting fees, and knowing when to exit.
Understanding Uniswap V3: Concentrated Liquidity
Uniswap V3 (and V4, launched 2025) introduced concentrated liquidity — the most important innovation in AMM design since the original constant product formula.
Traditional AMMs (Uniswap V2):
Liquidity is spread evenly across all prices from 0 to infinity. If ETH is at $2,000, your liquidity provides equal depth at $100 and $10,000 — prices where almost no trading actually happens. Capital efficiency is poor.
Uniswap V3 concentrated liquidity:
You choose a specific price range within which to provide liquidity. If ETH is at $2,000 and you provide liquidity between $1,800–$2,200, all your capital is concentrated where actual trading happens. This makes your capital up to 4,000x more efficient — meaning you earn a much higher share of fees on trades within your range.
The tradeoff:
- If price stays within your range → you earn fees proportional to your concentrated position
- If price exits your range → you stop earning fees entirely and hold 100% of the depreciating asset
For beginners, this adds complexity. That’s why stablecoin pools (where price stays near 1:1 always) are the best starting point — you can provide concentrated liquidity with minimal management needed.
Before You Start: What You Need
1. MetaMask or compatible wallet
Downloaded from the official MetaMask.io site. Ensure you have the browser extension for desktop (the Uniswap app works best on desktop for LP management).
2. Equal dollar values of both tokens
Uniswap requires you to deposit both tokens in the pool in equal dollar amounts at the current price.
Example (ETH/USDC pool):
- ETH price: $2,500
- To deposit $1,000 total: provide $500 worth of ETH (0.2 ETH) + $500 USDC
Exception for stablecoin pools: Curve (not Uniswap) is generally better for stablecoin liquidity — Uniswap’s stable pools exist but Curve dominates that market.
3. ETH for gas fees
- Ethereum mainnet: $15–50+ per LP transaction (position creation, collection, removal)
- Arbitrum: $0.05–0.50 per transaction
- Base: $0.01–0.10 per transaction
For beginners: use Arbitrum or Base — same Uniswap V3 functionality at a fraction of the gas cost.
4. Access to Uniswap
Official URL: app.uniswap.org — bookmark it, verify the domain carefully.
Step 1: Choose Your Pool
Selecting the Right Token Pair
The most important decision — determines your fee potential and impermanent loss risk.
For beginners (lowest risk):
- USDC/USDT — Stablecoin pair. Near-zero impermanent loss. Fees are modest but consistent.
- USDC/DAI — Another stable pair. Similar characteristics.
Intermediate:
- ETH/USDC — The most liquid Uniswap pool globally. High volume = good fees. IL risk when ETH price moves significantly.
- WBTC/ETH — Major asset pair. Both tend to move together (reducing IL) but still carry significant volatility.
Advanced (higher risk/reward):
- ETH/LINK, ETH/ARB, ETH/OP — Mid-cap pairs with good volume on major networks.
- Volatile pairs with high volume — potential for high fees but significant IL exposure.
Checking Pool Volume and Fees
Before committing, check the pool’s metrics:
- Go to info.uniswap.org (Uniswap Analytics)
- Search for your token pair
- Review:
- 24h Volume — how much trading happened
- TVL — total liquidity in the pool
- 24h Fees — total fees generated
The fee APR formula:
Fee APR ≈ (24h Fees / TVL) × 365 × 100
If a pool has $5,000 in 24h fees and $10,000,000 TVL:
Fee APR ≈ ($5,000 / $10,000,000) × 365 × 100 = 18.25% APR
This is the fee income you’d earn annually as a proportional LP — before considering impermanent loss.
Important: Always compare fee APR to your expected impermanent loss based on the pair’s volatility.
Step 2: Choose Your Fee Tier
Uniswap V3 pools come in four fee tiers:
| Fee Tier | Best For | Typical Use |
|---|---|---|
| 0.01% | Stablecoin pairs (USDC/USDT) | Near-zero volatility pairs |
| 0.05% | Correlated pairs (WBTC/ETH, stETH/ETH) | Low-volatility pairs |
| 0.30% | Standard pairs (ETH/USDC, ETH/DAI) | Most common, medium volatility |
| 1.00% | Exotic/volatile pairs | High volatility, low-liquidity assets |
How to choose:
The fee tier is not your choice to optimize — the market already decides which tier has the most liquidity and volume for each pair. Check which fee tier for your chosen pair has the highest TVL and volume on Uniswap Analytics — that’s the one to use.
For ETH/USDC: the 0.05% and 0.30% pools both have significant liquidity. The 0.05% pool serves traders who are price-sensitive; the 0.30% pool earns more per trade.
Step 3: Choose Your Price Range
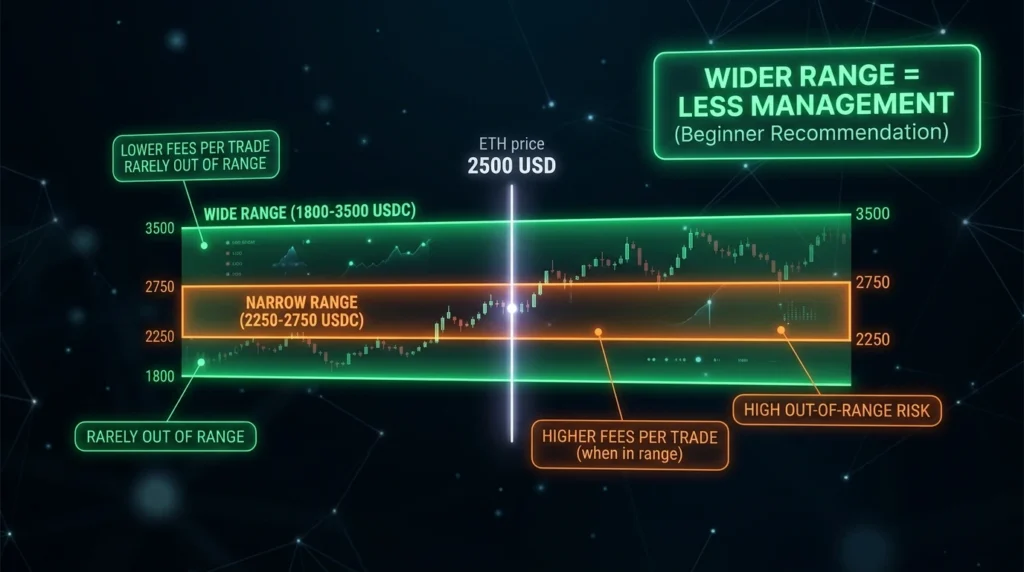
This is the most complex part of Uniswap V3 LP — and the most important for capital efficiency and managing impermanent loss.
For Stablecoin Pools (USDC/USDT)
Recommended range: $0.99 – $1.01 (extremely tight — stablecoins always trade here)
Extremely tight ranges on stablecoins are safe because the price never leaves this range under normal conditions. You earn very high fees relative to your capital because all your liquidity is concentrated at the exact price where trading happens.
For Volatile Asset Pools (ETH/USDC)
This requires a judgment call about how wide to set your range:
Narrow range (±10-15% from current price):
- Higher capital efficiency = more fees earned per dollar
- Position goes “out of range” if price moves significantly
- Requires active management — if ETH moves 20%, you need to reset your position
Wide range (±50-100% from current price):
- Lower capital efficiency = fewer fees per dollar
- Less likely to go out of range
- Less active management needed
- Closer in behavior to Uniswap V2
For beginners with volatile pairs: use a wider range (±30-50%) — accept lower capital efficiency in exchange for less active management and more time in range.
Practical example for ETH at $2,500:
- Min price: $1,800 (28% below)
- Max price: $3,500 (40% above)
- This range covers significant ETH price movements before requiring repositioning
Step 4: Add Liquidity — Step by Step
Step 1: Go to app.uniswap.org
Step 2: Click “Pool” in the top navigation
Step 3: Click “+ New Position”
Step 4: Select your token pair
- Click the first token selector → search and select your first token (e.g., ETH)
- Click the second token selector → select your second token (e.g., USDC)
Step 5: Select fee tier
Choose the appropriate fee tier for your pair (check analytics first).
Step 6: Set your price range
- You’ll see a liquidity depth chart showing current price
- Set Min Price and Max Price for your range
- The interface shows how your capital is distributed across the range
Tip: The “Full Range” option mimics Uniswap V2 behavior — good for beginners who don’t want to manage ranges actively, but with lower capital efficiency.
Step 7: Enter deposit amounts
- Enter the amount of one token — the interface automatically calculates the required amount of the second token based on the current price and your selected range
- If your price range is very wide or asymmetric, the required ratio changes
Step 8: Approve tokens
If this is your first time using these tokens with Uniswap:
- Click “Approve USDC” (or whichever token requires approval)
- Confirm the approval transaction in MetaMask
- Pay the gas fee (~$0.05–0.50 on Arbitrum)
Step 9: Click “Add” (or “Preview”)
Review the summary showing:
- Token amounts to deposit
- Your price range
- Selected fee tier
- Estimated share of pool
Step 10: Click “Add Liquidity” and confirm in MetaMask
Step 11: Your LP position is created
After confirmation, your position appears under “Your Positions.” You receive an NFT representing your specific LP position (unlike Uniswap V2 which used fungible LP tokens).
Understanding Your LP Position NFT
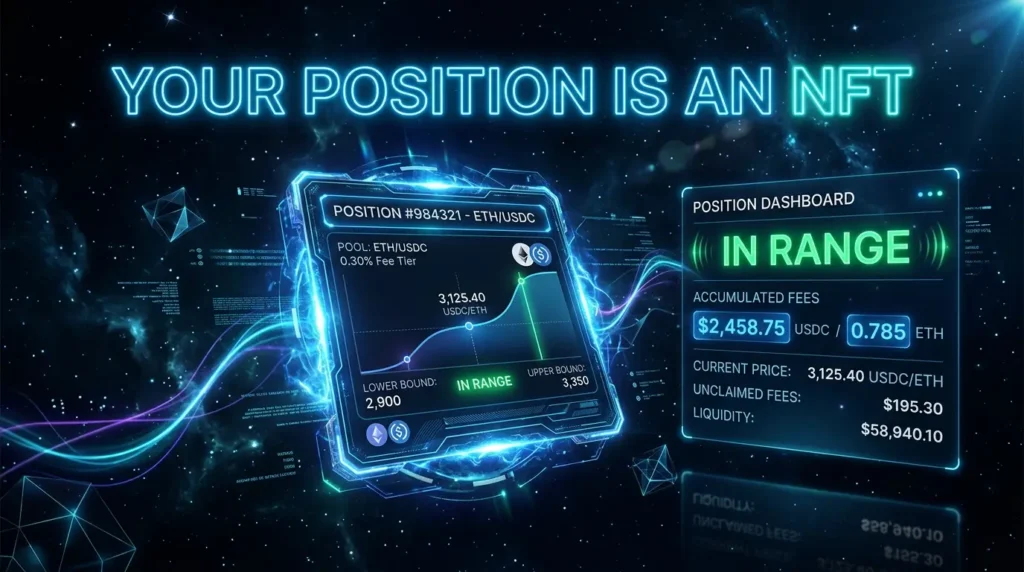
In Uniswap V3, your LP position is represented by a non-fungible token (NFT) — because each position is unique (specific price range, specific tokens, specific fee tier).
This means:
- Your position is in your wallet as an NFT
- You can see it in “Your Positions” on the Uniswap app
- You can transfer it (if you transfer the NFT, you lose the position)
- You must use the Uniswap interface to collect fees and remove liquidity
Do not transfer your LP NFT accidentally — if you send it to the wrong address, your liquidity is gone.
Step 5: Monitoring Your Position
After adding liquidity, regularly check:
1. Is your position in range?
The app shows “In range” (green) or “Out of range” (orange/red) for each position. Out-of-range positions earn zero fees.
2. How much fees have you earned?
The “Collected fees” section shows accumulated fees you can claim.
3. What’s the current IL?
External tools like Revert Finance (revert.finance) or APY.vision calculate your exact impermanent loss versus simply holding.
Step 6: Collecting Your Fees
Fees accumulate in your position but don’t automatically go to your wallet — you must claim them manually.
Step 1: Go to app.uniswap.org → “Pool” → your position
Step 2: Click “Collect fees”
Step 3: Confirm in MetaMask
Fees are sent to your wallet as the two tokens in your pool (e.g., ETH and USDC).
Gas consideration: On Ethereum mainnet, collecting fees costs gas. For small positions, it may not be worth collecting until fees are significant. On Arbitrum/Base, fee collection is cheap (~$0.05–0.10).
Frequency: Collecting fees doesn’t affect your LP position — you can collect at any time without removing liquidity. Collected fees are in your wallet; uncollected fees stay in the position.
Step 7: Managing Out-of-Range Positions
When ETH price moves significantly, your position may go out of range. This is common with concentrated liquidity.
What happens when out of range:
- You stop earning fees
- Your position is 100% one token (the cheaper one in the pair)
- Example: ETH/USDC position where ETH drops below your min price → you hold 100% USDC (the position has already “sold” all ETH as it fell)
Options when out of range:
Option 1: Wait
If you believe price will return to your range, you can wait. Your position resumes earning fees automatically when price re-enters your range. No action needed.
Option 2: Remove and reposition
- Remove liquidity from the out-of-range position
- Create a new position centered around the current price
Option 3: Add a new position without removing
Create a new position at the current price range while leaving the old one. This costs gas but avoids realizing IL on the old position.
Step 8: Removing Liquidity
When you want to exit:
Step 1: Go to your position on app.uniswap.org
Step 2: Click “Remove Liquidity”
Step 3: Choose the percentage to remove (25%, 50%, 75%, or 100%)
Step 4: Click “Remove” and confirm in MetaMask
You receive:
- Your remaining liquidity in both tokens (at current pool ratios)
- Any uncollected fees (collected automatically upon removal)
Realized IL: The moment you remove liquidity, your impermanent loss becomes realized. If ETH doubled since you entered, you’ll have less ETH and more USDC than you deposited — this is the realized impermanent loss.
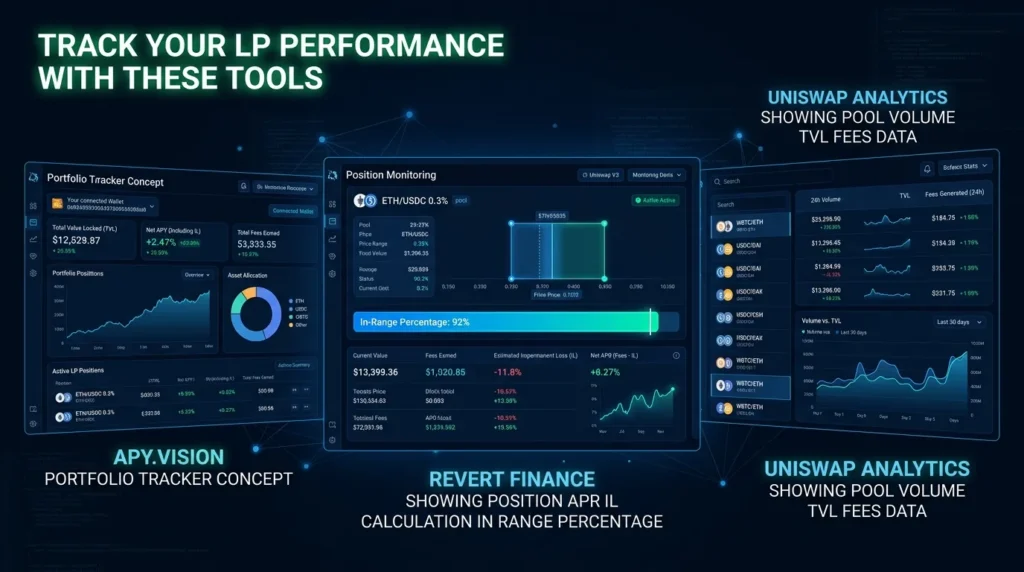
Tools for Uniswap LP Management
Revert Finance (revert.finance):
The best tool for monitoring Uniswap V3 positions. Shows exact IL, fee income, APR, time in range, and helps decide when to reposition.
Uniswap Analytics (info.uniswap.org):
Official pool analytics — volume, TVL, fees, 24h data for every pool.
APY.vision:
Portfolio tracker with IL calculation and LP performance metrics.
DeFiLlama:
Protocol-level TVL and fee tracking.
Uniswap V3 vs V2: Which to Use?
Uniswap V2 (still available):
- Full-range liquidity automatically
- No active management needed
- Lower capital efficiency
- Still used on some networks
Uniswap V3/V4 (recommended):
- Concentrated liquidity — higher efficiency
- Active management optional (wide range mimics V2 behavior)
- More complex but more profitable for active managers
For beginners: Use V3 with a wide price range or Full Range option — you get V3’s infrastructure with V2-like simplicity.
Common Mistakes When Providing Liquidity on Uniswap
Setting too narrow a range without monitoring:
A ±5% range on ETH/USDC sounds great for capital efficiency — but ETH moves 10% in a day regularly. Without daily monitoring and repositioning, you’ll spend most time out of range earning zero fees.
Not checking fee APR before entering:
A pool with $100M TVL and $10K daily fees has 0.00365% daily fees — barely worth the gas. Always check volume/TVL ratio before providing.
Using mainnet for small positions:
$500 in LP on Ethereum mainnet might cost $30 in gas to enter and $30 to exit. Use Arbitrum or Base.
Forgetting about impermanent loss in volatile pairs:
The pool showing 50% fee APY might generate significant IL if one token does a 5x or collapses. Gross APY minus IL equals real return.
Providing volatile pair liquidity without understanding IL:
Complete our guide to impermanent loss before entering any non-stablecoin pool.
Not collecting fees before repositioning:
Uncollected fees are automatically collected when you remove liquidity — but if you’re repositioning (not fully exiting), collect first.
Key Terminology
Concentrated Liquidity: Providing LP in a specific price range rather than across all prices — the core Uniswap V3 innovation.
Price Range (Min/Max): The price boundaries within which your liquidity is active and earning fees.
In Range / Out of Range: Whether current price is within your set range — determines whether you earn fees.
Fee Tier: The percentage charged on each trade in a pool (0.01%, 0.05%, 0.30%, 1.00%).
LP NFT: The non-fungible token representing your unique Uniswap V3 position.
Tick: Uniswap’s internal price representation — each tick represents a 0.01% price increment.
Capital Efficiency: How much of your capital is actively earning fees — concentrated liquidity dramatically improves this.
Revert Finance: Third-party analytics tool for Uniswap V3 position monitoring.
The Bottom Line
Providing liquidity on Uniswap can be genuinely profitable — particularly on high-volume pools where fee income exceeds impermanent loss. The key variables:
- Pool selection: High volume, manageable IL risk
- Fee tier: Use the most liquid tier for your pair
- Price range: Wider = less management; narrower = more efficiency but more active work
- Network: Use Arbitrum or Base unless your position is large enough for mainnet gas to be proportionally small
Recommended starting path:
- Start with a stablecoin pool (USDC/USDT, 0.01% tier) on Arbitrum
- Use full range or a very wide range ($0.99–$1.01 for stablecoins)
- Add $100–200 to experience the mechanics with minimal risk
- Monitor fees accumulating over 1–2 weeks
- Graduate to ETH/USDC only after understanding IL mechanics thoroughly
Uniswap LP is not passive in the same way that bank interest is passive. It’s active asset management with DeFi mechanics. Approach it as a skill to develop — starting small and building knowledge before scaling capital. 🌊
Disclaimer: This article is for informational and educational purposes only and does not constitute financial advice. Providing liquidity on Uniswap involves significant risks including impermanent loss, smart contract vulnerabilities, and total loss of capital. Always conduct your own research.


 in DeFi? Complete Guide (2026)")
")